Author: NST

Myself Narender Singh Thakur ( NST ) and i share my Experience/Knowledge and Tricks for folks and beginners to solve their issues while making websites through this Planet.

How to Replace Images Links/path in WordPress After Installing an SSL Certificate ?

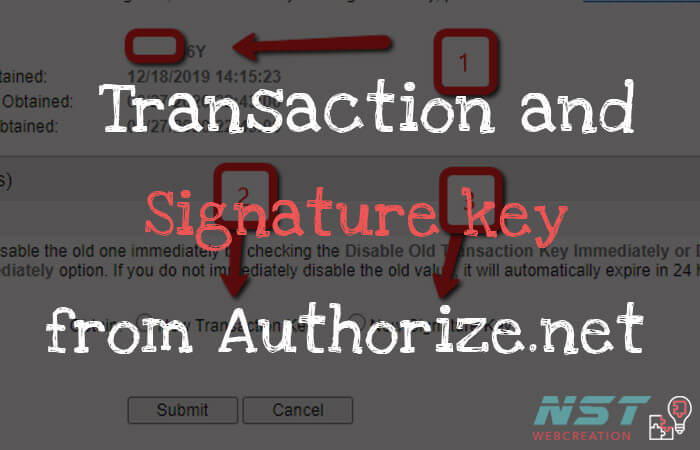
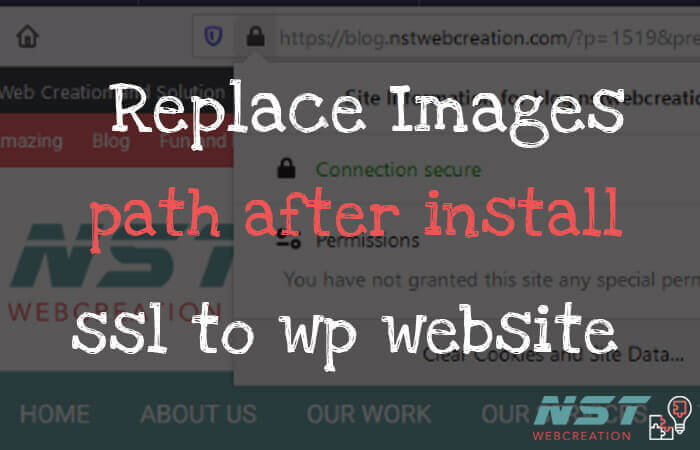
Here is one of the way to replace images link or path in WordPress After Installing an SSL Certificate into your website.

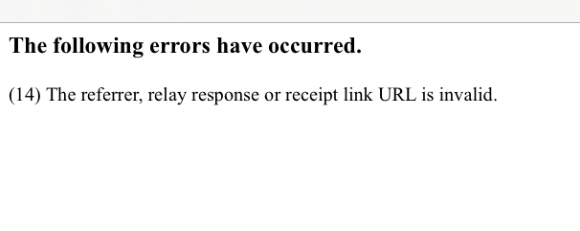
Every time when we install SSL into our wordpress website .. After successfully installing SSL .. the website show us a error in address bar that your site is not fully secured .. Like here

website is not fully secured

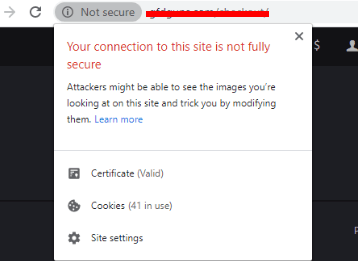
Don’t panic – just read here for the fix.

Steps :-

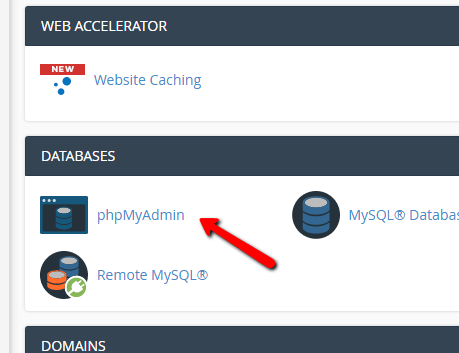
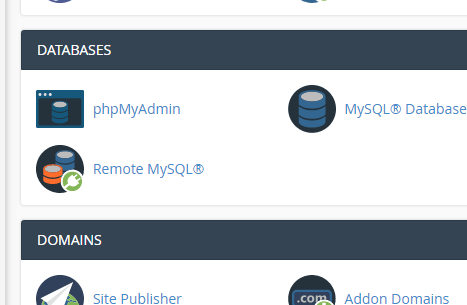
1) Login to Your website hosting cPanel and Click on phpMyadmin icon link option.

database phphmyadin link

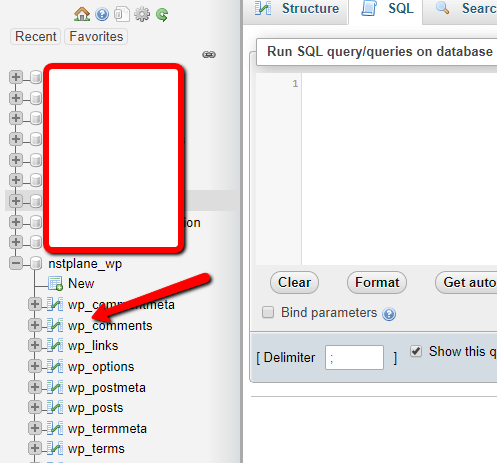
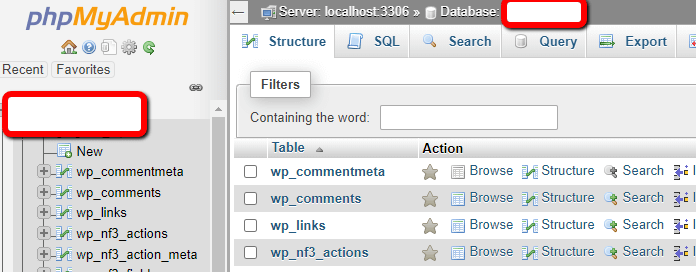
2) New window will be like this and you can select and click on the database from the left panel.. you are using into your website.

select your database

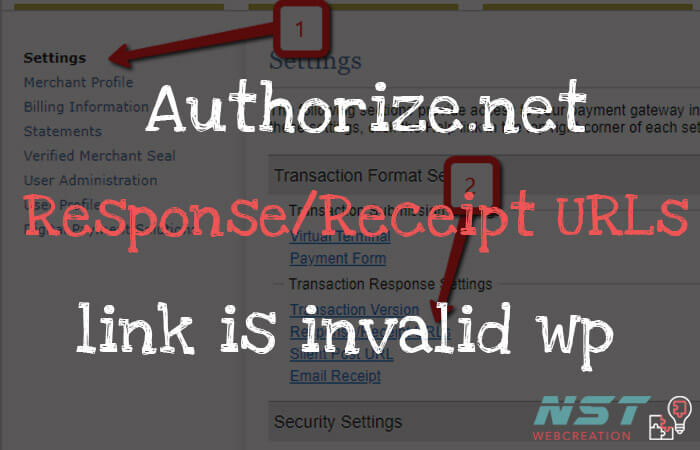
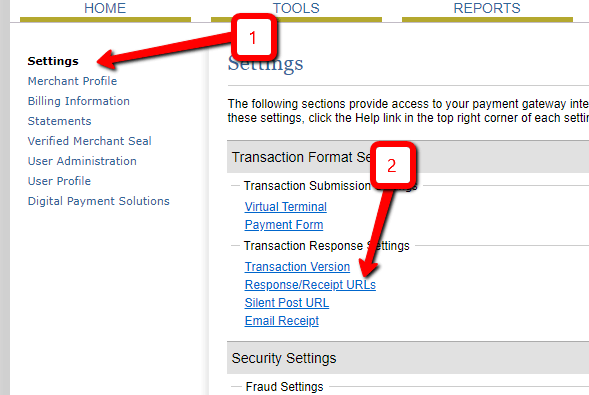
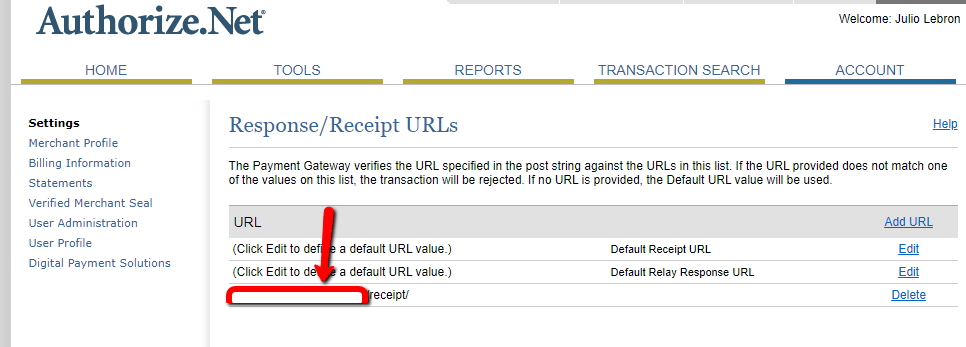
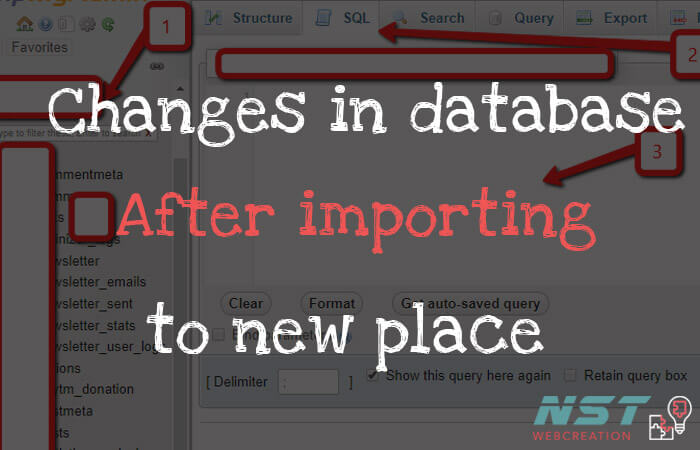
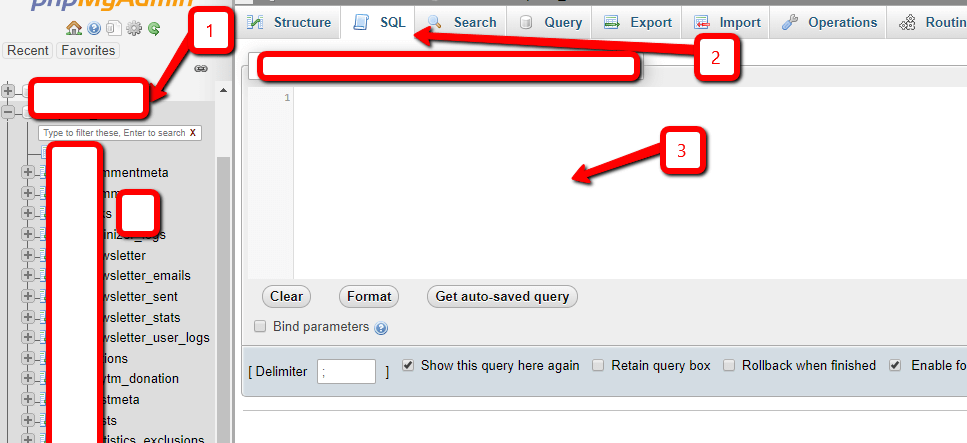
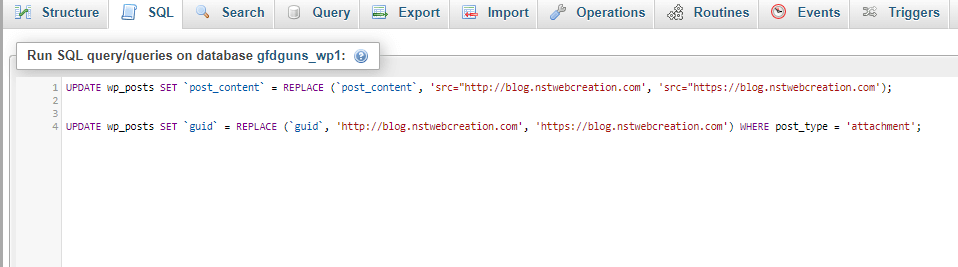
3) After this Click on SQL tab to add the code there. Here to follow as number wise..

phpmyadmin steps to change images path

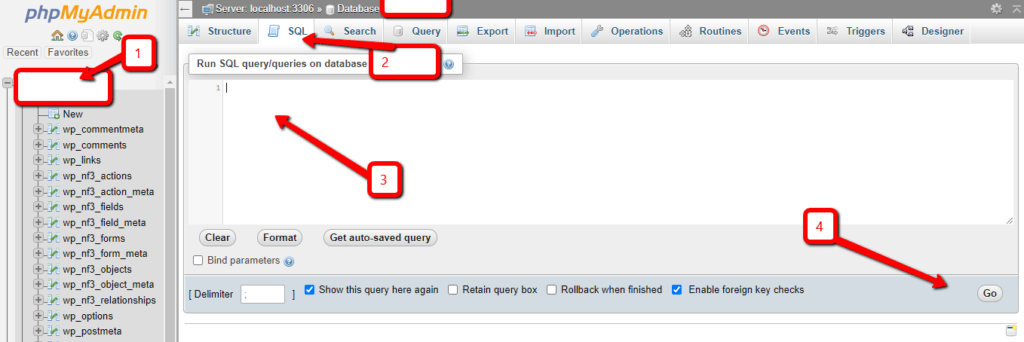
As per above images..

1 you have to choose your database.
2 is to click on SQL tab.
3 is to add Code there.
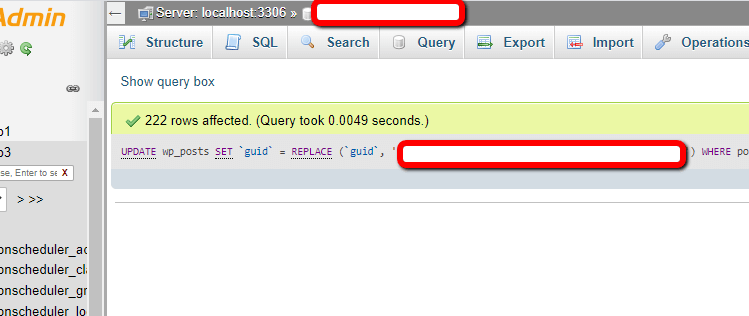
4) Hit on Go button to apply the changes.

Here is the code to add there…

UPDATE wp_posts SET `post_content` = REPLACE (`post_content`, 'src="http://blog.nstwebcreation.com', 'src="https://blog.nstwebdesign.com');


UPDATE wp_posts SET `guid` = REPLACE (`guid`, 'http://blog.nstwebcreation.com', 'https://blog.nstwebdesign.com') WHERE post_type = 'attachment';

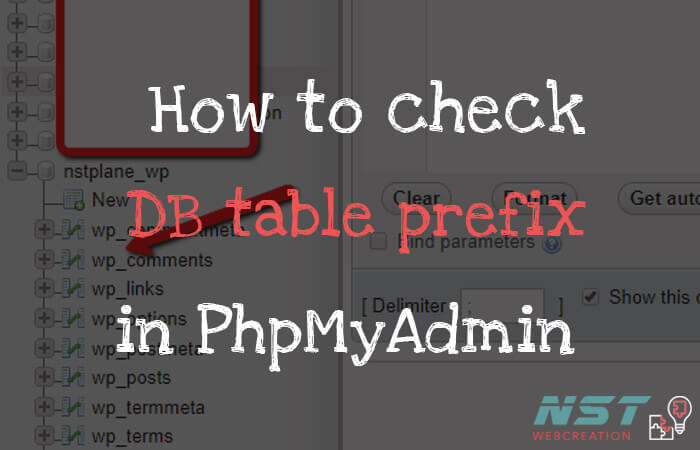
Please Note.. Don’t forgot to change the url “blog.nstwebcreation.com” with your website url .. and also check your database table prefix too…

wp_posts in my code… table prefix is wp_ .. you can check your one.

Here is the link to know.. how to check or confirm your database table prefix.

database url change script

After making changes in Code .. Click on Go button right bottom of the editor section visible in above screenshot.

After click it will be show message similar to like this…

database images url updated

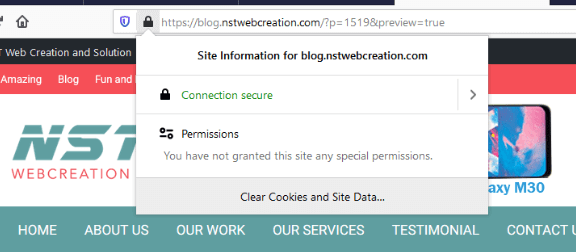
Now you can refresh your website and the new message will be Like this..

connection is secure now

I hope this will help you and for further help or information you can Contact with me using chat box or contact form.

Thanks πŸ™

How to get Transaction and Signature key in Authorize account ?

Steps to get Login ID and Transaction Key and Signature Key from the Authorize account.

1) Login to your Authorize.net account.

2) Click on Settings from the left panel.

settings of authorize .net payment

3) After this click on API Credentials & Keys like link below..

API Credentials & Keys

4) After click on that.. new window will be like..

signature and transaction key

So here in screenshot above.. pointed 1 is your Login ID.

Pointed 2 you have to select that option “New Transaction Key” and new option to check will be “Disable Old Transaction Key Immediately” .. just check/enable this and click on submit.

After click on Submit it will verify you by sending PIN number on your registered email address.

Just add that PIN number you received on email id and get your Transaction key after adding that to text box…

Copy the key and enter into plugin settings.

Pointed 3 For Signature key … repeat the same steps (2) above after select the “New Signature Key” option.

I hope this will help you and for further help or information you can Contact with me using chat box or contact form.

Thanks πŸ™

Authorize.net : The referrer-relay response or receipt link URL is invalid

Authorize.net payment getway showing error “the referrer, relay response or receipt link URL is invalid”

Here is the way to solve the “referrer, relay response or receipt link URL is invalid” this error comes while doing payment in woo-commerce etc..

the referrer, relay response or receipt link URL is invalid

Steps :-

1) Login to your Merchant Interface at https://account.authorize.net.

2) Click on Settings from the left side panel.

3) Then click on Response/Receipt URLs under section Transaction Format Settings.

response receipt url under Transaction Format Settings

4) New window will be like this then click on Add URL there.. right side of the section. You can add url like “https://nstwebcreation.com/reciepts” .. Please change nstwebcreation with your website url .

You Can add new page “Reciepts” in pages and then add link in place of above url.

Now you can test on live website by doing payment through authorize.net as you know.

authorize.net

I tested and it’s working okay for me.

I hope this will help you and for further help or information you can Contact with me using chat box or contact form.

Thanks πŸ™

How to align text to center in Revolution slider plugin ?

Revolution slider plugin text alignment in wordpress :-

Here are the steps to align text to center in revolution slider plugin.

  1. Login to wordpress and goto revolution slider setting.
  2. Edit the slider you want to align text.

slider revolution plugin text alignment

3) After Click on that .. New window will be like this… and follow the screenshot steps to reach in that settings.

slider revolution plugin text alignment center wp

According to above Screenshot Point ..

  1. Select the layer text you want to center.
  2. Click on that style arrow.
  3. Then click on Spaces tab like in screenshot.
  4. Click on that box and choose your option.

Then Save your settings and check the result.

I hope this will definitely help you.. if you still need help then contact me here.

Thanks πŸ‘ πŸ™‚

How to check database table prefix in wordpress ?

Here is the simple way to check the database table prefix from the PhpMyAdmin.

Login to you hosting cPanel and click on PhpMyAdmin .. like here

php my admin in cpanel

Then in the list of databases … click on the database that is used.

database table prefix

So like here is wp_ is table prefix..

If still not cleared then please contact with me using chat box or contact form. Thanks

Shopify : Show Free shipping text If Product price > 30 on product page!

Here is the code to show free Delivery text on product page shopfy.

{% if product.price >= 3000 %}

Free Delivery on orders over Β£30

{% endif %}

note: the product.price returns a integer, so 30.00 = 3000

You can make the order condition as per you need.

Thanks

how to find your custom post type slug name ?

Here is the way to find custom post type slug name in your website…


function nst_custom_post() { register_post_type( 'Movie', array( 'labels' => array( 'name' => __( 'Movie' ),
'singular_name' => __( 'Movie' )
)

In this function above.. post type slug is ‘Movie


Or you can check by click on any custom post and check in address bar..

slug_name custom post

That’s All πŸ™‚

If still not cleared then please contact with me using chat box or contact form.

Thanks πŸ™

Make changes in database after importing into new place/domain!

Make changes in database after import to live in wordpress.

Here are simple code you have to edit and paste into your domain database SQL tab and then click on GO to process it..

Here is the code

UPDATE wp_options SET option_value = replace(option_value, 'http://www.oldurl', 'http://www.newurl') WHERE option_name = 'home' OR option_name = 'siteurl';

UPDATE wp_posts SET guid = replace(guid, 'http://www.oldurl','http://www.newurl');

UPDATE wp_posts SET post_content = replace(post_content, 'http://www.oldurl', 'http://www.newurl');

UPDATE wp_postmeta SET meta_value = replace(meta_value,'http://www.oldurl','http://www.newurl');


Steps to follow :-

  1. As you see the above code.. you have to change the url of the domain path as per OLD and NEW.
  2. http://www.oldurl is path of where from you want to move.
  3. http://www.newurl new path of where you want to install or move.

Also please check the table prefix of your database.. if it is started with “wp_” then it’s okay other wise change this too as per your tables.

Click here ..how to check used database table prefix

Go to database and click on the database is used.

After this click on SQL tab and paste the above code .. i mean the one you changed now as per new and old url.

Like here ..

1) Click on used database
2) Then click on “SQL” tab.
3) Then paste the code in query box.
4) After this hit the “Go” button .. right side of the query box.
5) it will show you Successfully done message when the query is completed.

That’s it .. i hope this helps you and if still has any confusion then please contact me by chat box or contact forms.

How to change amount decimals to without decimals in Shopify ?

Shopify to show product price with and without decimals.. mostly need in Debut theme Shopify.

Change amount from decimals to without decimals.

Β 

Go to admin and click on left side menu option Settings and then Click on General.. like here..

Β 

Scroll down near to “Store currency” and click on Change formatting ..

Β 

Click on “Change formatting” …

Output of this..

Β 

If you want amount without decimals then follow these..

OutPut:-

live_amount_with_decimal_number

Β 

Here are mostly used Codes to follow:-

Money format

  1. {{ amount }} Output will be 1,143.14
  2. {{ amount_no_decimals }} Output will be 1143


Thanks πŸ™‚

How to add custom fields option to custom post type wordpress ?

How to fix if custom fields option not showing in dashboard posts or pages ..

Here are Steps to Follow:

  1. Simply Login to your website and edit any post from the listed posts.
  2. First check if it is not unchecked by default in dashboard by click on Screen Option .. right side of screen.
custom field option not checked in dashboard wordrpess


If the Custom field not showing in “Screen Option” section on top then follow these steps to add custom filed option to any custom post type .


custom-filed-option-in-post-type


Like here..

no-custom-field-option


if you don’t know how to create custom post then follow this previous post to know more..


Here is the code of custom post type..

<?php 
function nst_custom_post() { register_post_type( 'Movie', array( 'labels' => array( 'name' => __( 'Movie' ),
'singular_name' => __( 'Movie' )
),
'public' => true,
'has_archive' => true,
'rewrite' => array('slug' => 'movie'),
'supports' => array('title', 'editor','thumbnail','excerpt','custom-fields'),
)
);
}
// Hooking up our function to theme setup
add_action( 'init', 'nst_custom_post' );
?>


Find your post code in functions.php file if its added recently and just add ‘custom-fields‘ option to ‘supports’ line .. like above to show in post dashboard.


Note : if you don’t know how the custom post is added in your website then here is simple way to add custom filed.


add this function to your active theme functions.php file ..


add_post_type_support( 'my_post_type', array(
    'excerpt', 'custom-fields',
) );


Just change the my_post_type to your post type.. then save this..


Now refresh that edited post page.. Custom Field option will appear now..

That’s it.. πŸ˜‰ Thanks πŸ‘


Click to Chat